How to Install Laravel 8 on Windows, Ubuntu and macOS? 2025 Guide

Laravel is the choice of a broad community of coders and programmers to build a website or an application. As a web application framework, it acts as a starting point that helps build a seamless digital product for the best user experience. However, the process includes a lot of technicalities that require you to hire Laravel developers who can help you install the latest version of Laravel along with leverage features like unit and integration testing, thorough dependency infection, expressive database abstraction layer, and much more.
Currently, Version 11 is the latest version of Laravel, released on 12th March 2024. The new version is all set to be supported until 3rd September 2025 for bug fixes and 12th March 2026 for security fixes. This guide will help you to know how to install Laravel 8 on Windows 10, Ubuntu and macOS.
Create Laravel New Project by Installing Laravel 8
The process to create a new project after installing Laravel is regarded as a pretty straightforward task.
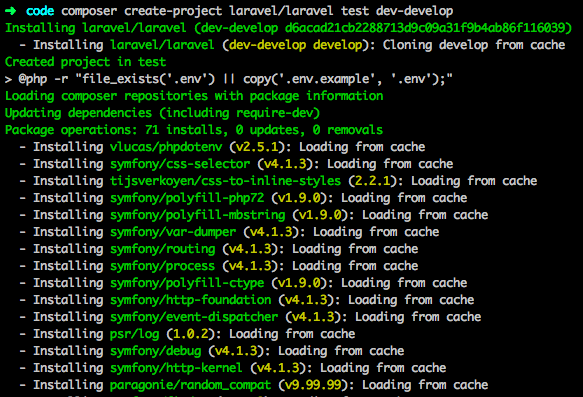
Step 1. The first thing to do is run the following command after opening up the terminal:
$ composer create-project –prefer-dist laravel/laravel laravel-8-crud-app 8
Step 2. The aforementioned command will help you to install Laravel 8. Following that, it is important to verify the version installed and that can be done by typing the following command:
$ cd laravel-8-crud-app
$ php artisan –V
Laravel Framework 8
Step 3. After that step, you need to install the front-end dependencies, which can be done with the help of the package.json file. The dependencies include:
- axios
- bootstrap
- cross-env
- jquery
- laravel-mix
- lodash
- popper.js
- resolve-url-loader
- sass
- sass-loader
- vue
Note – To install the aforementioned dependencies, you need to give this command:
$ npm install
Following the aforementioned step, a folder titled node_modules can be seen and you can find the installed dependencies in it.
Install Laravel 8 Using Composer

There are several ways in the process of installing Laravel, one of them using Composer. The first thing to do for this way to work is installed Composer, which is the PHP package manager. Do the following:
You need to download the installer from the official website using the URL:
$ cd ~
$ curl -sS https://getcomposer.org/installer -o composer-setup.php
The Composer Can be Installed Using the Following Command:
$ sudo php composer-setup.php –install-dir=/usr/local/bin –filename=composer
To ensure that installation works as it is supposed to, you can type this on the terminal:
$ composer
Upon the successful installation of Composer on the system, a new Laravel 8 project can be created easily.
Certified Laravel Developers [Hire in 1 Hr]
Request A Free Quote
Install Laravel 8 Using Xampp
The process of installing Laravel can also be achieved by using Xampp, which is a popular web server solution stack package. To install Laravel 8 using this method, Xampp needs to be installed with these steps:
Step 1. Download the Xampp.exe file
Step 2. Select the components that need to be installed with Xampp, important ones being PhpMyAdmin, Apache and MySQL
Step 3. Select the destination folder to store the files
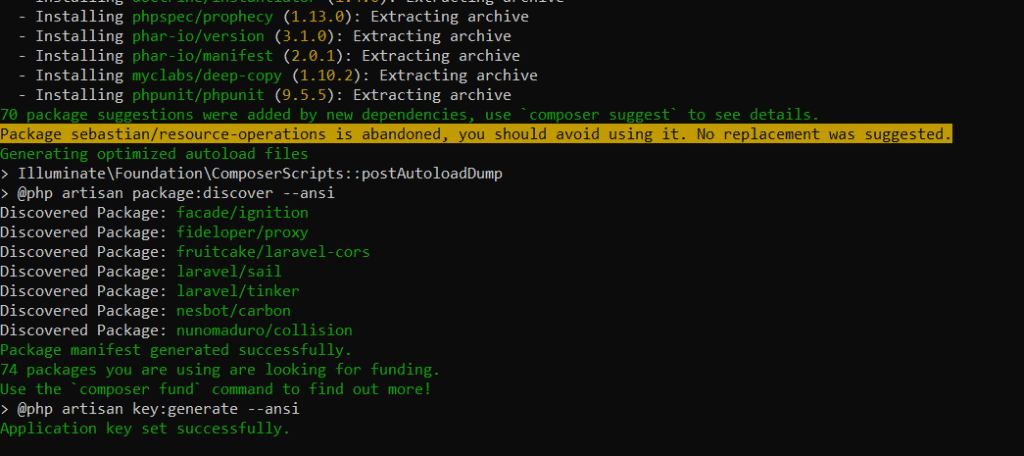
After installing Xampp, Composer needs to be added to the system, which later helps in the installation of Laravel 8 in the system. That can be done by the following steps:
Step 1. Type the following command on the terminal:
composer create-project –prefer-dist laravel/laravel:^8.0 yourproject
Step 2. Go to the project folder using command
Step 3. Afterward, the application can be started locally using the following command:
PHP artisan serve
Also Read: How to Install Flutter 2.0 on Mac, Windows, Linux, and Android?
How to Install Laravel 8 in Windows 10?
Windows is one of the preferred operating systems amongst PHP Laravel developers. However, to install Laravel 8 on Windows 10, one needs to set up XAMPP. That can be done with the following steps:
1. Download XAMPP
- Download XAMPP for Windows from https://www.apachefriends.org/download.html
- Select components such as phpMyAdmin, MySQL and Apache and run the installer
- It is better to install XAMPP in C:\ to avoid facing issues with Windows user permissions
2. Install XAMPP
To set up XAMPP, install Composer by doing the following
- Download the Composer’s installer for Windows from https://getcomposer.org/download/
- Run the installer from the path directory C:\xampp\php
3. Install Laravel with Composer
Firstly open Window’s Command Prompt (cmd.exe) and type the following:
cd C:\xampp\htdocs
Install Laravel using Composer with the help of the following command:
composer create-project –prefer-dist laravel/laravel example
4. Setting Laravel’s .env file
To set up Laravel’s .env file you need to do two things:
Access C:\xampp\htdocs\example
Afterwards, open the config/database.php file and make edits to the MySQL Connection settings like this:
‘mysql’ => [
‘read’ => [
‘host’ => [
],
],
‘write’ => [
‘host’ => [
],
],
‘sticky’ => true,
‘driver’ => ‘mysql’,
‘database’ => ‘laravel’,
‘username’ => ‘root’,
‘password’ => ‘THE ONE YOU CREATED THE USER WITH’,
‘charset’ => ‘utf8mb4’,
‘collation’ => ‘utf8mb4_unicode_ci’,
‘prefix’ => ”,
],
5. Setting up Virtual Host with XAMPP
To install virtual host access this folder C:\xampp\apache\conf\extra
ext, open httpd-vhosts.conf and type:
NameVirtualHost *:
DocumentRoot “C:\xampp\htdocs\example\public”
ServerName example.com
ServerAlias www.example.com
<Directory “c:/xampp/htdocs/example/public”>
Require all granted
6. Enable mod_rewrite for Laravel
- Open the file httpd.conf that can be found in C:\xampp\apache\conf\extra
- Look for LoadModule rewrite_module
7. Installing Local Domain with Hosts File
- Go to the location c:\Windows\System32\Drivers\etc
- Open the hosts file with administrative privileges and type the following
- www.example.com example.com
How to Install Laravel On macOS?
Installing Laravel on macOS requires a functioning intel chip system that is connected to the internet. It involves the following steps:
Step 1. Installing Homebrew with the following command:
/bin/bash -c “$(curl –fsSL https://raw.githubusercontent.com/Homebrew/install/HEAD/install.sh)”
Step 2. Installing PHP & Composer using Homebrew. Give this command on the terminal:
brew install php
Setting up Composer is just as easy. Type the following:
brew install composer
Step 3. Install Laravel Valet, which is known for its speed. However, to do so, it is important to install local database, which can be done by typing:
brew install mysql
Step 4. To install Laravel Valet, you can use Composer. To do so type:
composer global require laravel/valet
Step 5. To run Laravel applications from macOS machines type this on the project directory:
valet open
Step 6. Bonus – Installing Lambo, which can be set up by first installing the Laravel Installer, which can be done by the command:
composer global require laravel/installer
After the aforementioned command, Lambo can be installed by running:
composer global require tighten/lambo
Also Read: How to Download Magento 2 and Install With Sample Data?
How to Install Laravel 8 in Ubuntu?
Installing Laravel is possible on the 20.04 System of Ubuntu. To make installation possible in Ubuntu, here are some of the prerequisites:
- 2 GB or more RAM
- Root privileges
- Ubuntu 20.04 System
- Understanding the Basic Usage of Debian/Ubuntu System
Here are the steps involved in installing Laravel 8
Steps 1. The first thing to do to set up Laravel on Ubuntu is to install Apache Webserver. It equips the system with the UFW firewall that enables connections for services like HTTPS, HTTP and SSH. The Apache web server can be installed with the following apt command:
sudo apt update
sudo apt install apache2
Upon the completion of setup, add the Apache service to the system boot after starting it.
systemctl start apache2
systemctl enable apache2
After completing the aforementioned process, type the following command:
systemctl status apache2
Add the HTTPS, HTTP and SSH services to the firewall once the Apache service starts running. Do so with the following command:
for svc in ssh http https
do
ufw allow $svc
done
Later, enable the UFW firewall services with this:
sudo ufw enable
To continue, press Y and enable the UFW firewall.
To go to the default Apache index.html page, open the web browser and type the server IP address on the address bar.
Steps 2. Secondly, install and Configure PHP 7.4 that will help in the installation of Laravel on Ubuntu. That can be done by typing this command:
sudo apt install libapache2-mod-php php php-common php-xml php-gd php-opcache php-mbstring php-tokenizer php-json php-bcmath php-zip unzip
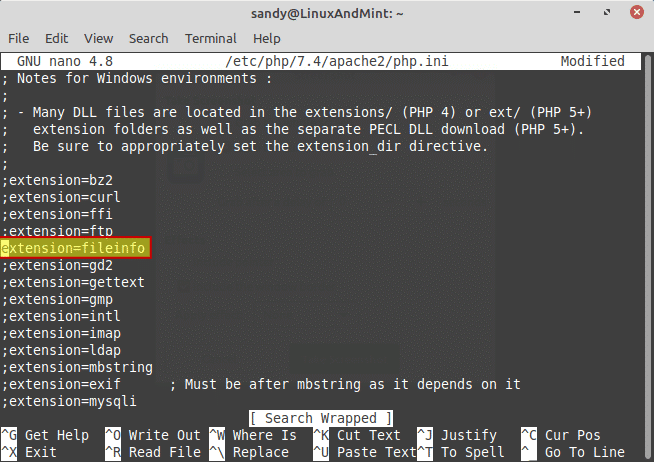
After the aforementioned installation, access the /etc/php/7.4/ directory and edit the configuration titled php.ini for Apache2 web server by typing this:
cd /etc/php/7.4/
vim apache2/php.ini
After that, type this and save the process:
cgi.fix_pathinfo=0
After the aforementioned process, restart the Apache service by applying the new php.ini configuration by typing this:
systemctl restart apache2
Because of the aforementioned step, PHP 7.4 has been installed successfully.
Steps 3. Install Composer, which is an application-level package manager that enables the PHP Laravel developer to download the libraries and dependencies to the PHP project. However, before installing Laravel, set up the Composer by downloading the binary file and move it to the /usr/local/bin directory by:
curl -sS https://getcomposer.org/installer | php
sudo mv composer.phar /usr/local/bin/composer
Following that, you need to check the version of Composer by typing this command:
composer –version
Steps 4. After setting up the Composer, you can install Laravel 8 on Ubuntu 20.04 through different two different ways, namely, through the Composer and the Laravel Installer.
Via Composer – Access the directory titled /var/www/ and start a new Laravel project titled blog with the command:
cd /var/www/
composer create-project –prefer-dist laravel/laravel blog
Following that, you will get a new project directory titled blog, where the ownership of the project should be changed to www-data. After that, make the ‘storage’ directory writable with the command:
sudo chown -R www-data:www-data /var/www/blog
sudo chmod -R 775 /var/www/blog/storage
As a result of the aforementioned step, Laravel 8 has been installed with the help of the Composer command.
Through the Laravel Installer – The best type of installation for developers, with the help of Installer, Laravel can be installed with a non-root user. First, create a user name and set up its password with the help of the following command:
useradd -m -s /bin/bash
passwd
Following that step, log in with the user name.
After that, set up the Laravel Installer package using the command:
composer global require laravel/installer
After the completion of installation, add the bin directory to the PATH environment through the ~/.bashrc configuration with the help of vim editor. In the end of the line, type the following configuration:
export PATH=”$HOME/.config/composer/vendor/bin:$PATH”
After the addition of bin, use the command Laravel to create a new project titled blog. Run the following command:
laravel new blog
To make it possible for the Apache webserver to access the Laravel project directory, change the directory’s group owner and make it writable. Give the following command:
sudo chgrp -R www-data /home//blog
sudo chmod -R 775 /home//blog/storage
Thanks to the aforementioned steps, Laravel has been saved in your system with the help of the Laravel installer.
Steps 5. The fifth step revolves around setting up the Apache virtual host for the Laravel Project. Access the directory titled /etc/apache/sites-available and generate a new virtual configuration laravel.conf using the vim editor. Type the following command:
cd /etc/apache2/sites-available/
vim laravel.conf
After the command, make the changes to the domain and the webroot directory and type this configuration:
ServerName
ServerAdmin [email protected]
DocumentRoot /home//blog/public
/blog>
Options Indexes MultiViews
AllowOverride None
Require all granted
ErrorLog ${APACHE_LOG_DIR}/error.log
CustomLog ${APACHE_LOG_DIR}/access.log combined
Afterwards, you need to initiate the Laravel virtual host configuration and Apache rewrite module by typing the said command:
sudo a2enmod rewrite
sudo a2ensite laravel.conf
Following the aforementioned procedure check the Apache configuration for errors. If none is found, restart the Apache service with:
apachectl configtest
systemctl restart apache2
After completing the above step, open the web browser type either the domain name or the IP address on the address bar to check if Laravel 8 was installed in Ubuntu successfully.
Also Read: How to Become a .Net Developer?
Hire Dedicated Laravel Developers
Request A Free Quote
Laravel Configurations
Upon creating Laravel, a folder titled config, which is located at the root of the app. Within this folder are default configuration files, all of which are configuration settings for the application. An easy file to keep in mind is the config/app.php, which consists of things like application language and application name. Here are some of the things to do while setting up Laravel’s configuration settings:
1. Getting a config value
The config helper function can be used to retrieve information from any configuration file. For example, to get the name of an app, you can type the following:
config(‘app.name’)
To echo the contents of the code mentioned above, the result will be that string name inside the file titled config/app.php
Another way to retrieve a configuration value is to type:
\Config::get(‘app.name’)
2. Setting a config value
Configuration can also be changed that too manually by modifying the string in the config file. An alternative way to hardcoding the value is to change dynamically, which can be done by typing:
config([‘app.name’ => ‘My Radical Application’]);
Moreover, this can be done with the \Config too. That can be done by doing this:
\Config::set(‘app.name’, ‘My Radical Application’);
NOTE – If not managed well, dynamically changing configuration files might result in some strange behaviour. Because of that, several developers usually advise not to edit config dynamically.
3. Your Environment File
An environment is a location where the application is running. So, if a developer is working on a local machine, the environment will be considered local. It is one of the most important files while adding configurations to the Laravel application. Usually identifiable by a file titled .env.example and in most of the cases, it needs to be renamed .env. Below is an example of a default .env file in Laravel:
APP_NAME=Laravel
APP_ENV=local
APP_KEY=
APP_DEBUG=true
APP_URL=http://localhost
LOG_CHANNEL=stack
DB_CONNECTION=mysql
DB_HOST=
DB_PORT=
DB_DATABASE=Laravel
DB_USERNAME=root
DB_PASSWORD=
BROADCAST_DRIVER=log
CACHE_DRIVER=file
QUEUE_CONNECTION=sync
SESSION_DRIVER=file
SESSION_LIFETIME=
REDIS_HOST=
REDIS_PASSWORD=
REDIS_PORT=
MAIL_MAILER=smtp
MAIL_HOST=smtp.mailtrap.io
MAIL_PORT=
MAIL_USERNAME=null
MAIL_PASSWORD=null
MAIL_ENCRYPTION=null
MAIL_FROM_ADDRESS=null
MAIL_FROM_NAME=”${APP_NAME}”
AWS_ACCESS_KEY_ID=
AWS_SECRET_ACCESS_KEY=
AWS_DEFAULT_REGION=us-east-1
AWS_BUCKET=
PUSHER_APP_ID=
PUSHER_APP_KEY=
PUSHER_APP_SECRET=
PUSHER_APP_CLUSTER=mt1
MIX_PUSHER_APP_KEY=”${PUSHER_APP_KEY}”
MIX_PUSHER_APP_CLUSTER=”${PUSHER_APP_CLUSTER}”
The new config files found inside the config/app.php will look like this:
env(‘APP_NAME’, ‘Laravel’),
/*
|——————————————————
| Application Environment
|——————————————————
|
| This value determines the “environment” your
| application is currently running in. This
| may determine how you prefer to configure
| various services the application utilizes.
| Set this in your “.env” file.
|
*/
/*
|——————————————————
| Application Debug Mode
|——————————————————
|
| When your application is in debug mode, detailed error
| messages with stack traces will be shown on every
| error that occurs within your application. If
| disabled, a simple generic error page
| is shown.
|
*/
‘debug’ => (bool) env(‘APP_DEBUG’, false),
Also Read: How to Become a Web Developer
Conclusion: Installation of Laravel 8
One of the reasons why should hire Laravel developers is that you are free to create applications without worrying about little details. Whether you are new to this field or an experienced professional, hire Laravel developers as the web application framework will give a significant boost to your career. So what are you waiting for?!
Great Together!
Latest Blogs

Offshore Website Development: Benefits and Cost in 2026
Key Takeaways Offshore website development is the process in which a business chooses to partner with a development company established…

What is Artificial General Intelligence (AGI)?
Artificial Intelligence is a worldwide popular technology that is now revolutionizing the world. It was invented to turn basic computers…
![Everything About WordPress Development – [ A Handy Guide ]](https://theninehertz.com/wp-content/uploads/2020/08/How-Much-Does-WordPress-Development-Cost.jpg)
Everything About WordPress Development – [ A Handy Guide ]
The creation of Matt Mullenweg and Mike Little, WordPress rolled out in 2003. Ever since then, the WordPress Development platform…