Building an app could be a tedious task especially when you are putting your blood and sweat and working on it for days, weeks, and months. But mere building an app is not where the story ends. In fact, then the actual story begins.
Once you have done with the iOS app development process, the next crucial step is to submit the app to the app store which in itself is quite a task. But hey, don’t worry, as it is not as complicated as it may seem either. You just need to follow some set of rules and guidelines.
This is a complete step-by-step guide where you can learn everything about publishing and submitting your app to the app store. You can actually learn the entire procedure from scratch so that you can finally launch your dream app and publish it to the whole world.
In this tutorial, you will learn what actually happens when your app is built, what are the prerequisites that apple asks for you to pass their certification process, what is the apple developer program, what are the steps to configure the app, and finally, how do you get your app into the app store. If you want to launch your own iPhone app, find the list of top iPhone app development agencies.
Overview: Publish and Submit an App to the App Store
Okay, now as far as the overview of the process for submitting your app to the app store is concerned, there are majorly three parts to this equation:
1. The provisioning Profile
2. App Store Connect
3. And finally, Xcode
Provisioning basically implies the identity and permissions associated with a known developer which are installed on a known device along with the authority to access all of the services associated with it such as Game Center and so on. All this relevant information is collectively stored in a provisioning profile which is necessary before you submit your app to the app store.
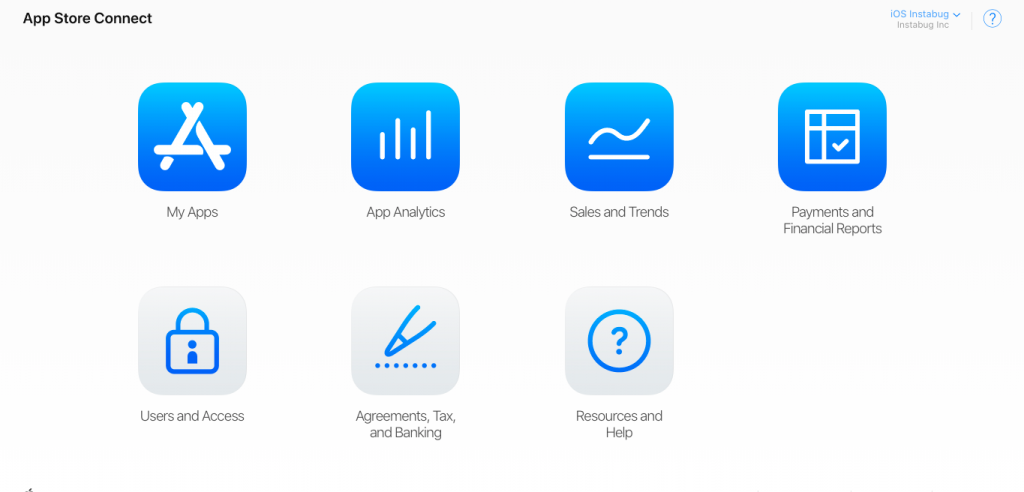
Secondly, App Store Connect is the website for the submission and management of your apps in the app store. Logging in to the app store connect website will enable you to perform series of actions such as creating a brand new app store listing, managing your existing app store listing, tracking your app analytics and financial reports, and even providing your banking information so that you can get paid.
And lastly, Xcode which is an Integrated Development Environment (IDE) for macOS where you can actually build and test your app. Once you are done with building and testing your app in Xcode, you can create an archive (basically a package or bundle containing your code and resources for you to submit) which you can submit to the app store connect website for approval.
Pro Tip – It is highly recommended that you run the app on one or more iDevices in real-time before submitting it to the Apple App Store.
This was a brief discussion about the process of app submission to the app store. Now let’s deep dive into the topic and try to understand the overall procedure in detail.
Checking the Pre-Requisites
First and the foremost thing for a warrior is to check his weapons before stepping into the war. Therefore, you must also have a checklist of these prerequisites that you must ensure are in place before starting your app publishing journey which is as follows:
- The Project which is ready for submission and in line with the Apple app submission guidelines.
- A valid Apple Developer Program Account. (not referring to the Apple Developer Enterprise Program)
- A Computer system that can support MacOS X.
- And lastly, Xcode, which is an IDE, should be properly installed.
Submit iOS App on App Store Step by Step Guide
Step 1. Creating an iOS Distribution Provisioning Profile and Distribution Certificate
The development provisioning profile and certificate that you have been using are only targeted to specific devices. If you wish to distribute your app to beta testers and the app store users, you will be needing a separate distribution provisioning profile and distribution certificate.
Xcode provides you the easiest way to do this. Xcode will handle the task of creating and managing certificates, signing identities, and handling device registration for you provided the automatic signing is enabled. In cases where there is manual signing, here is the list of steps you should perform to manually sign your app.
- The first step is to add your Developer Program Account to Xcode. Select Xcode from the top menu and choose preferences.
- Click on Account and then at the bottom left corner, press + sign, and then Add Apple ID.
- Enter the details of your Apple Developer Program as in your Apple ID and Password.
- The next step is to enable automatic signing. Choose a target from the project editor and select General.
- Click on the triangle icon while scrolling down the Signing section in order to expand the settings.
- Click on the option ‘Automatically Manage Signing’ and select your team.
When a new device is connected to your Mac, it is automatically detected and registered to your team provisioning profile. It is to be noted that for launching an app for a device, it needs to be registered on your team provisioning profile.
Note: It is to be noted that in order to submit apps to the Apple app store, you need to get enrolled in their Apple Developer Program. It costs only $99 per year and gives you tons of benefits including:
- Accessibility to submit apps to the app stores on all the available apple platforms.
- Accessibility to create safari extensions and the option of listing them in the extensions gallery.
- Exclusive access to the Beta versions of Apple Software
- Access to various tools such as TestFlight where you can test your app.
- App analytics and advanced app capabilities.
Remember, that without enrolling in this program you cannot get your apps into the apple app store. Also, not renewing the program in the subsequent year will terminate your membership next year.
Step 2: Creating an App Store Connect Account
You can easily create an App Store Connect account by following either of the two steps:
- Create your own App Store Connect organization as a team agent. Login with the same ID password you used in the Apple Developer Program or you can hire an iOS app developer.
- The second option is to get an invitation by an existing organization as a user with a role such as an Admin, Technical or App Manager.
For Apps that are Paid
Submitting a paid app will require signing a contract covering all the necessary terms and conditions of payment. If your app is free you can skip this process. On the app store connect dashboard click on Agreements, Tax, and Banking. Further, click on the request tab under “Request Contracts”. Review the agreement by checking the box and finally clicking to Submit.
Now in the new window, click on Add New Contract followed by entering your information. Next, fill the details by clicking set up in the tax info column. As soon as you complete this step, the status of the contract will appear as ‘Processing’ until it is verified by Apple which usually takes an hour to complete. At last, under ‘Contracts in Effect’ your contract will start appearing.
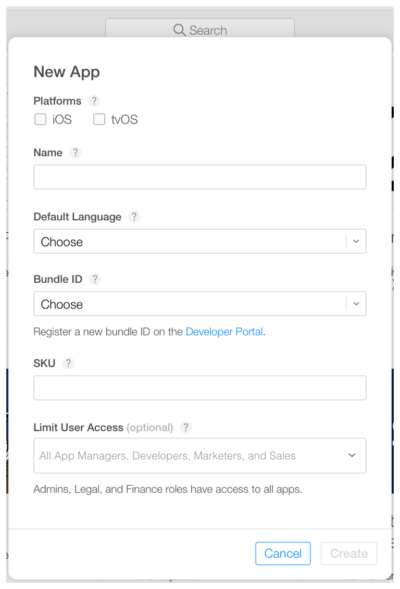
Now you can add a new app, but there are many challenges which face by the developer in developing the iPhone app before reach this stage. Select My Apps in the app store connect dashboard. Click on the + sign and then click on to New App. Details like, platform, app name, bundle ID, default language, and SKU are required in order to create a new App Store Connect Record. These are as follows:
- Make use of Keywords in your app name for optimization.
- The bundle ID must be an exact match of the bundle identifier in your Xcode project info.
- As far as the SKU is concerned, the users don’t see it. You are free to set up according to you. It can be a symbol or an identifier that is associated with your organization or can be anything adding some meaning. You can include numbers, letters, hyphens, underscores, etc. But make that it should always begin with a letter or number.
Step3: Achieve and Upload
Before submitting your app for review through App Store Connect, you must upload the same by using Xcode. Follow these steps mentioned below:
- In Xcode, you need to choose the Generic iOS device as the deployment target.
- Click on Archive after choosing Product from the top menu.
- Any Archives created in the past will get displayed by the Xcode organizer.
- Select the app that you have built and click on the tab Upload to App Store.
- Click choose after selecting your credentials.
- In the next window that will appear, you need to click on Upload to finish the process
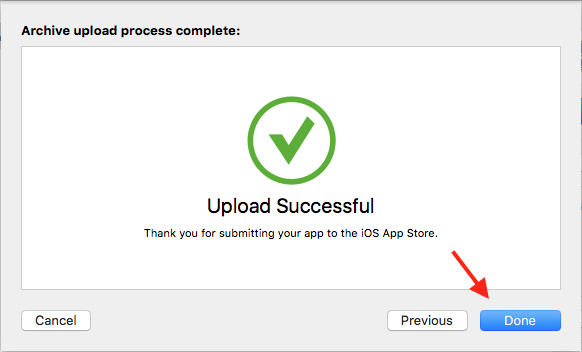
The overall process will take a little time and after the completion, a success message will appear showing the upload has been done successfully. Click on Done.
Step 4: Configuration of Your App’s Metadata
There is another prerequisite that you would be requiring before publishing your app on the app store. This implies to collection of information which includes:
- An Icon
- A Screenshot/app preview
- Metadata
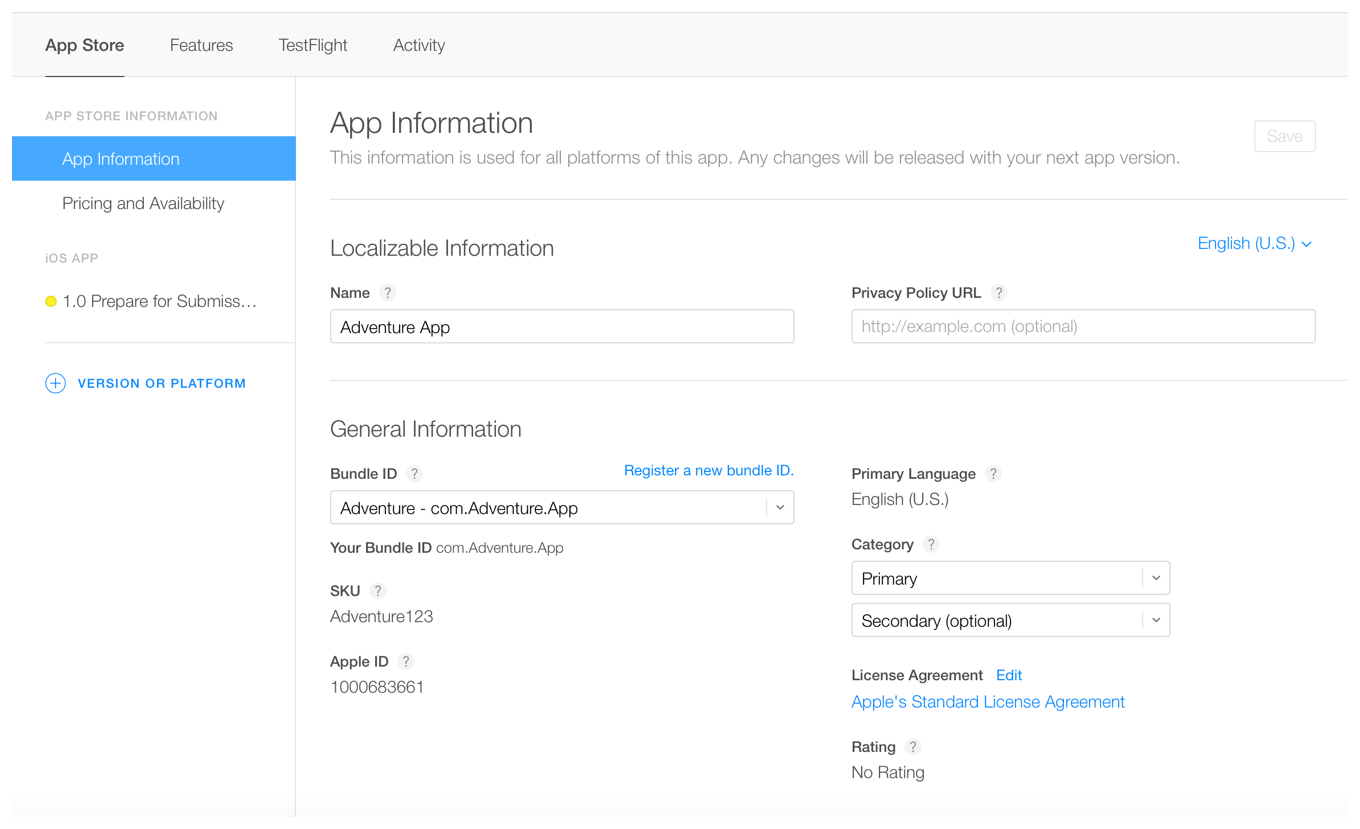
In-App Store Connect, you can add additional languages, categories, and the URL of your app’s privacy policy in the “App Information” page under the App Store Tab.
You can either set your app as free or you can add a price tag on the “Pricing and Availability Page”.
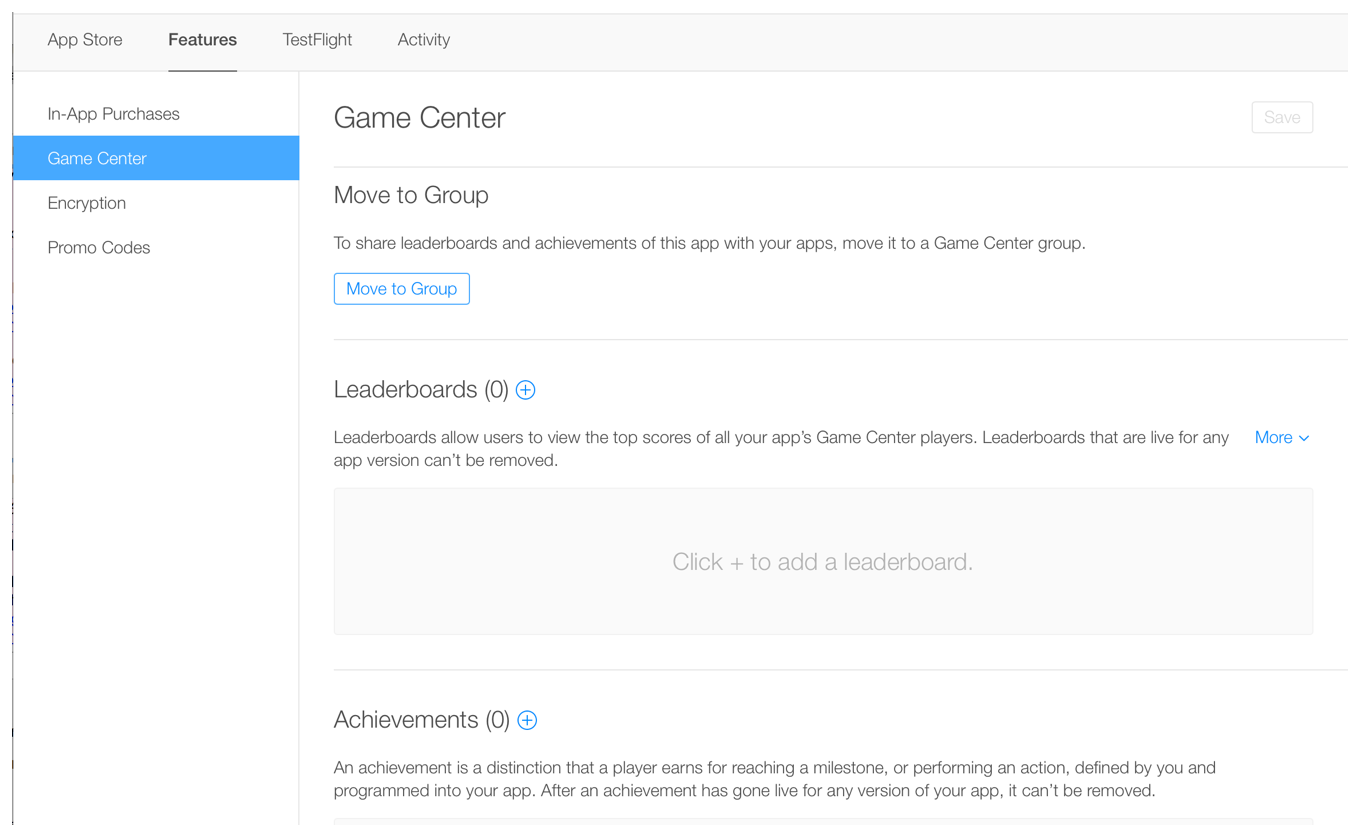
The “Features” tab will give access to configure to any app store technologies in your App, such as in-app purchases and Game Center.
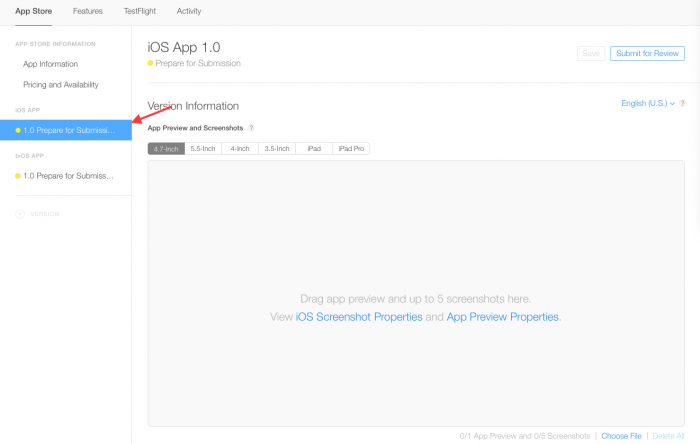
Your app will be marked with a yellow dot at this stage. Further, the status of your app at this stage shall be “Prepare for Submission” under the heading “App store”. You need to select the build you wish to configure. By this, you can easily add further information related to your product page on the app store.
Step 5: Uploading the Screenshots
Upload the screenshots of your app in JPEG or PNG format. You can perform uploading your screenshots for one device and use them multiple sizes according to the device.
Save the document by clicking on save after the upload has been done.
Note: When it comes to screenshots there are three popular techniques or ways you could create your screenshots.
App store connect provides you the specifications of the size of screenshots according to the various Apple devices like iPad, Apple Watch, MacBook, etc.
Here are the Three Techniques to Create Your Screenshot in App Store
Technique 1 🡪 Raw Screenshots
The most convenient way for creating screenshots is by the help of the iOS Simulator. You just need to launch your app in the iOS simulator according to the screen size that you need.
Further, navigate to the screen you want to take a screenshot of and press CMD+S on your keyboard. This process will put a PNG image file on your system so that you can simply upload it to App Store Connect.
Technique 2 🡪 Using a Mock Template
This is the second technique in which you will be needing a couple of tools to get started. You can use any of the graphic designing software namely:
- Sketch
- Abode Photoshop
- Figma
My recommendation would be Figma because it’s free and easy to use. That’s what is ben used in the screenshot above.
Next, you will be needing device mockups. Here is some platforms form where you can manage to get your device mockups:
Mockuphone
Mockuphone is completely free and the way to use it is also quite straightforward. You just need to select your device, upload your screenshot and download the mockup in landscape and portrait orientations. You can also import that later on to add further text on it.
Angle
It is a paid app where you can get mockups in various angles and device frames. You just need to import your favorite graphics program to use and you are good to go.
Rotato
This app is paid and will allow you to actually control the camera on a 3D Mockup in order to capture the perfect angle. Later, you can easily export the image and import it into your graphics program.
Technique 3 🡪 Using an App Store Screenshot Generator
If you are disinterested in using either mockups or any graphics software, then there are other tools in the market to make your overall process smooth and easy. There is a useful tool called DaVinci Apps – App Store Screenshot Generator.
The process is quite simple. You just need to select your favorite template and upload the screenshots. This tool also enables you to add customized text above your image. Later, you export all your screenshots in one go.
Therefore, when you are done with screenshots, simply go back to your app store listing and upload the already created screenshots.
Step 6: Adding Further Details in Your App Store Connect Record
After clicking save when you have uploaded the screenshots, you need to scroll down and add details including your app description, keywords, support URL, and Marketing URL.
Remember:
- Keywords and description of your app play a critical role. Optimizing them is necessary
- The Support URL could be a simple landing page with a form asking contact details.
- Next comes marketing URL which is basically your website link. This is optional
Under the section, “General App Information”, upload your app’s icon along with its version number, copyright, and other contact information. Following are the specification that you must adhere to:
- The Dimension of your app’s icon must be 1024px x 1024px.
- The version number should be identical to the Xcode version
- The copyright info somewhere looks like this, “Copyright © 2024, XYZ, Inc.
- And lastly, the contact information will be displayed to the users
Click on Edit to select the available options of ratings for your app. You need to be honest as your app might get rejected if it fails to match the rating.
Under the section “App Review Information” enter the details such as your contact info, sticky notes, and set the version release date. The contact details are for the reviewer or tester so that in case he needs to connect with you directly.
Notes are for the reviewer to see so that he gets the idea about the specifications of the app. And as far as the version date is concerned, for first releases, you should keep the version release date on automatic mode.
Click Save in the top right-hand corner and you are almost ready to submit your app for review.
Step 7: Submitting your app for review
Scroll to the build section and click on “Select a build before you submit your app” in your app’s app store connect record. Choose the build uploaded by Xcode and click “Done”. Click to save to successfully save the file and finally press the tab “Submit for Review”.
At the final step, answer the various identifier questions namely, Export Compliance, Content Rights, and Advertising Identifier. After answering the identifier questions, click submit.
Congratulations, you have successfully submitted your app and the status is now showing, “Waiting for Review”.
Step 8: Monitoring/Tracking the Status of Your App
Select Activity and then App Store versions in the left-hand panel in App Store Connect. Here you can monitor the current status of your app.
FAQ: App Submission in App Store
1. What is the Average Time to Get the App Store Approval?
ANS: Mostly it takes around one to three days in order to get the approval. Further, it can take up to 24 hours for your app to appear in the apple app store post-approval.
2. What Should I do if My App Got Rejected?
ANS: Don’t worry. Getting a one-time rejection is common. In that case, you just need to do the specified changes and fixes as mentioned by the tester or reviewer. You can use the resolution center in-app store connect to clarify your queries. You can also submit an appeal for a recheck if you feel your app was wrongly rejected.
3. What to Do After Getting the Approval?
ANS: Congratulations! Your app will now be displayed on the app store. You can see all the analytics such as sales, ratings, downloads, reviews, etc. directly in App Store Connect.
Great Together!
![How to Submit iOS App to App Store without rejection in 2024 [Updated]](https://theninehertz.com/wp-content/uploads/2020/09/How-to-Publish-and-Submit-an-App-to-the-App-Store.jpg)
